Trina from Will Cook For Shoes is here to share this lovely Laptop Sleeve! I am definitely going to have to make one for myself! :) Thanks Trina!


I'm so excited to be sharing this project with you today on the Fort Worth Fabric Studio blog!
Lately, I have been all about one-day sewing projects. I think it's because I've just finished some bigger quilts that have taken a while to complete so these "quick" projects are fun and fulfilling!
This project for a basic laptop sleeve came about because I am always scratching up my laptop. The stylish part came when I was inspired by this gorgeous little fabric bundle!
Seriously, how cute is this fabric. The first three from the left are Gigi Blooms, the fabric on the right is Plum Burnish, and all are from the Adornit line.
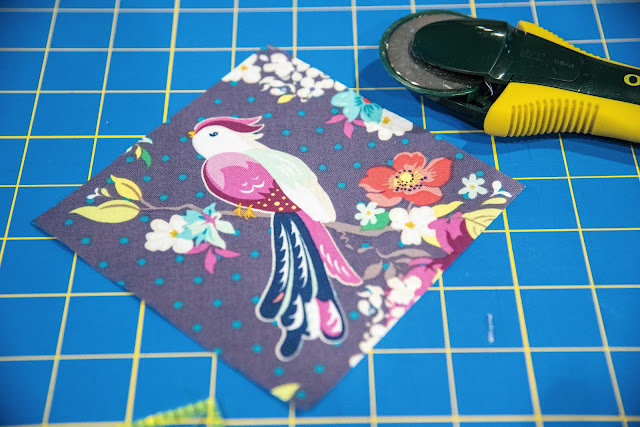
I love that they are all super saturated in colour and I love the birds on the first fabric on the left. Those birds called out to me (or did they tweet?) to be made into something with a fussy cut.
Depending on your fabric, you can choose to also do a fussy cut, a different design or quilt block, or just use one full piece of fabric.
That's the beautiful of this project! It's totally customizable.
The basic materials for this project are:
- two pieces of exterior fabric
- two pieces interior fabric
- two pieces of batting
- zipper
My laptop is 10 x 14 inches. I decided to make both my exterior and exterior fabric pieces to be 12 x 16 inches.
Fussy cuts are so much fun! I used a basic economy block technique to make the front of my laptop sleeve. This means my centre piece is five inches. For my economy block, I rotated it 90 degrees so my middle piece was a diamond and not the traditional square. If you have a fussy cut that is more suited to a square cut, you can use that too!
For the inner triangles, cut two 4 1/2 inch squares and then cut in half on the diagonal to create four triangles.
To make the outer triangles, cut two 5 1/2 inch squares. These are also then cut in half on the diagonal to create four triangles.
Sew the inner triangles on first. Using a 1/4 inch seam, sew one on the left and one on the right of your centre piece.
Press your seams and trim edges, then sew the opposite two triangles.
Press seams and trim so your economy block is square.
Repeat with triangles for outer layer.
This completes the basic economy block.
To make my front piece for my laptop sleeve, I added another four triangles to square up my block using 7 1/4 inch squares.
To make my exterior front piece the required 12 x 16 inches, I also added two strips of fabric to each side of my finished block. You may need to also trim your block vertically.
Place your batting on the wrong side of each of your exterior pieces. Pin in place or use adhesive spray and then quilt as desired.
I played around with some fun free motion quilting on the front. On the back I did some straight line quilting. I also added a little thread painting to my fussy cut square to add a little bit of embellishing.
You can do a straight zipper for this pouch as long as your sleeve isn't too snug, width-wise, for your laptop.
To add a little something extra to the laptop sleeve, I decided to do curved edges for my zipper.
This means that you will need a zipper that is several inches longer than the width of your fabric. I pre-trimmed the top edges of my fabric so they were curved. I used a circle template to mark and trim.
The zipper construction is fairly standard.
Line up the right side of your exterior fabric piece to the right side of the zipper. Place one side of the interior fabric right side down to create a sandwich. Around the curved edges, clip the zipper slightly so it gently curves. Pin in place and sew using zipper foot on your machine. Repeat for the other side.
To finish the bag, align all sides right sides together.
Make sure your zipper is open before you start sewing. Sew around all four sides. Stop at the zipper just to catch the fabric part of the zipper on each side.
On the interior section of fabric, leave a small opening (3-4 inches). Use this opening to turn your pouch right side out. Hand stitch or press the seams in and use a scant 1/4 inch seam on your sewing machine to close the opening on the interior fabric.
And there you have it. Your very own personalized laptop sleeve!


1 comment:
Thank you for the great tutorial!
Post a Comment